The engine life cycle is very simple, similar to the game standards.
As the LionEngine is a library (and not a program), you will have to create the first step of the life cycle: the Main
public class MainJava
{
    public static void main(String[] args)
    {
        // Here the program starts
    }
}
public class AppAndroid extends Activity
{
    @Override
    protected void onPostCreate(Bundle savedInstanceState)
    {
        super.onPostCreate(savedInstanceState);

		// Here the program starts
    }
}
Nothing new until there if you have enough knowledge in the domain.
Once the language entry point is clear, you may want to discover the engine life cycle.
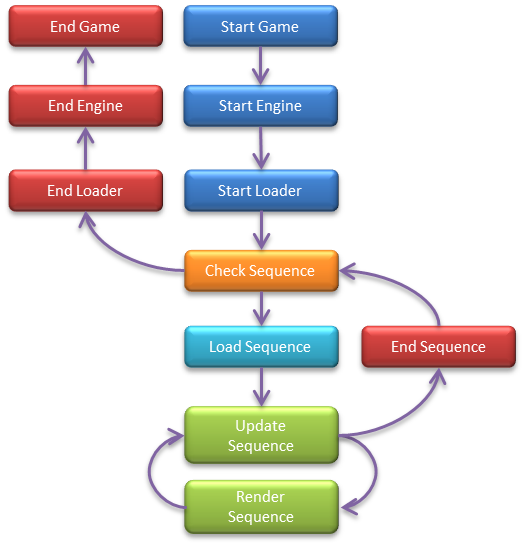
Here the completes tree structure of the life cycle:

The main idea behind this is that the Loader can be considered as a Sequence scheduler, where
each part of the game (introduction, menu, level...) represents a Sequence. So when a Sequence
is finished (end of an introduction, or a game level...), the application (and also the engine), is
not necessary finished. You may want to continue to another level, or simply start the menu after the introduction.
The application starts with the first Sequence you gave, and continues its life until its end (by simply
stop any activities, or start a new Sequence). In any case, this is the Loader that controls
theses steps. The only one condition to end a program is when the Loader does not have any new Sequence
to start. In that case, the engine will be closed, and the application will end (and the JVM will terminate).
The engine initialization must be made inside the main. This is where you will have the opportunity to setup the
engine, depending of your needs. You will have to define required elements, such as your program name &
version, the resources directory, the output resolution (plus an optional filtering), and finally
the first Sequence.
What about the required code ?
EngineAwt.start("Name", Version.create(1, 0, 0), "resources");

final Resolution output = new Resolution(640, 480, 60);
final Config config = new Config(output, 32, false);
final Loader loader = new Loader();
loader.start(config, Scene.class);
The initialization part is almost the same for both Java & Android target...
...excepted for a special case when using Android target, that must be applied to the first line (this):
EngineAndroid.start("Name", Version.create(1, 0, 0), this); This is because the resource directory is relative to the Android Application Activity, and can not be set manually (also due to access rights).
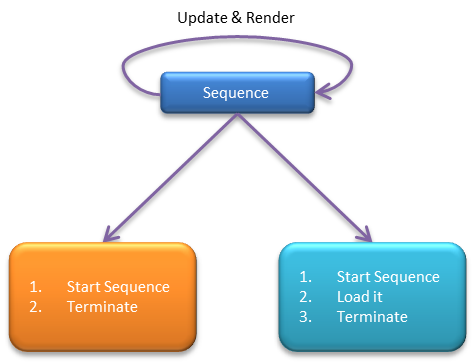
Once the engine is initialized and the loader is started with its first Sequence, the program is in
freewheel.

Sequence simply starts a new one, and terminates at the same time. Control goes to the new one.
Here an example on how to simply link two Sequence (where Menu is the first Sequence):
package com.b3dgs.lionengine.example.core.sequence;

import com.b3dgs.lionengine.Graphic;
import com.b3dgs.lionengine.Verbose;
import com.b3dgs.lionengine.core.Context;
import com.b3dgs.lionengine.core.Engine;
import com.b3dgs.lionengine.core.Resolution;
import com.b3dgs.lionengine.core.Sequence;

class SequenceFirst extends Sequence
{
    private int count;

    public SequenceFirst(Context context)
    {
        super(context, new Resolution(320, 100, 32));
    }

    @Override
    public void load()
    {
        count = 0;
    }

    @Override
    public void update(double extrp)
    {
        count++;
        if (count > 2)
        {
            end(SequenceNext.class);
        }
    }

    @Override
    public void render(Graphic g)
    {
        Verbose.info("SimpleLink rendering number " + count);
    }

    @Override
    public void onTerminated(boolean hasNextSequence)
    {
        if (!hasNextSequence)
        {
            Engine.terminate();
        }
    }
}
|
package com.b3dgs.lionengine.example.core.sequence;

import com.b3dgs.lionengine.Graphic;
import com.b3dgs.lionengine.Verbose;
import com.b3dgs.lionengine.core.Context;
import com.b3dgs.lionengine.core.Engine;
import com.b3dgs.lionengine.core.Resolution;
import com.b3dgs.lionengine.core.Sequence;

class SequenceNext extends Sequence
{
    public SequenceNext(Context context)
    {
        super(context, new Resolution(320, 100, 32));
    }

    @Override
    public void load()
    {
        Verbose.info("SequenceNext loaded !");
    }

    @Override
    public void update(double extrp)
    {
        end();
    }

    @Override
    public void render(Graphic g)
    {
        Verbose.info("I am Next !");
    }

    @Override
    public void onTerminated(boolean hasNextSequence)
    {
        if (!hasNextSequence)
        {
            Engine.terminate();
        }
    }
}
|
package com.b3dgs.lionengine.example.core.sequence;

import com.b3dgs.lionengine.core.Config;
import com.b3dgs.lionengine.core.Loader;
import com.b3dgs.lionengine.core.Resolution;
import com.b3dgs.lionengine.core.Version;
import com.b3dgs.lionengine.core.awt.EngineAwt;

public class AppSequence
{
    public static void main(String[] args)
    {
        EngineAwt.start("AppSequence", Version.create(1, 0, 0), AppSequence.class);
        final Resolution output = new Resolution(640, 480, 60);
        final Config config = new Config(output, 16, true);
        final Loader loader = new Loader();
        loader.start(config, SequenceFirst.class);
    }
}
The Sequence will end when count > 2, and start the next Sequence
called SequenceNext. One the next Sequence is started, it will simply definitely end (as we
called it).
Read next page: Base tools